Review + Swatch | Anastasia Beverly Hills | Liquid Lipstick in Craft


Hi guys! 

I know I have long been away.

Firstly, I had my exams. Then my exams ended and... my laptop charger broke. -_-" 
The replacement part just came in so here I am blogging!

So anyway, I recently gave in to the Anastasia Beverly Hills Liquid Lipstick hype.

I've avoided it for so long because;
- I tend to be skeptical on products that are overly hyped on social media
- ABH products aren't the easiest to get a hold of (I had trouble ordering mine)
- The shades available from the initial release didn't really toot my horn so... Yeah.

When I saw their Summer Collection however,
Credit: anastasiabeverlyhills.com
 I heard it call my name :O


For today, I'm only touching on the NEW Liquid Lipstick in Craft.

She's a stunner.


I love it so much that I wore it for consecutive days!


It's a deep mauve that I feel is extremely flattering on tan skin tones like mine.
(Did I just compliment myself? Hahahaha.)


It isn't loud but it still makes a statement. And it wears beautifully.
What more could I want right?

Texture: 5/5
Craft has a smooth, creamy consistency on the thicker side without being lumpy. Once the liquid lipstick sets, it has a smooth, non tacky texture on the lips. Smacking of lips does not pull the lipstick apart. 

Application: 5/5
The applicator included is a non-flexible, sponge tip, doe-foot applicator. On me, one dip sufficiently applied one layer, there was no need to go back for more. Despite the liquid being on the thicker side, it spreads out extremely well and is easy to control for precise application. It dries down within 2 minutes .

Pigmentation: 5/5
Considering the fact that I have dark brown lips, one layer is all I needed to get an opaque, even coverage. 

Longevity: 4.5/5
It lasted a whole work day, with meals, without drying my lips out and crumbling. Amazing! Although it does transfer when you blot after a meal, it doesn't affect the opacity on the lips. A little bit of colour does come off, depending on what you eat but for the most part, it stays put. Without eating, it is absolutely transfer proof. How it does that, I'm not entirely sure. Just know that this is awesomeeeeeee.:D


Note: My review is based on only one layer of application, as that was all that I needed. However, I did put on another layer to experiment and I found that it won't dry completely and is not transfer proof, even without eating. You see the edges of the swatch above? You can see that it didn't completely dry despite 10 minutes having passed. Those bits will smudge upon contact. It also gets drying after the second layer. Hope that helps!

Just a little bonus,

here's a lip swatch of Craft topped with Inglot | AMC Eye Pigment in #111

Perfect for Hari Raya, yes?

Hehe.

Although I do need to perfect the application on this lip look. I kinda overdid the glitter and had to cover it with more lipstick and you know what I said about multiple layers heh.
So forgive me if the above was imperfect :B

This shade left such a good impression that I'm contemplating getting the soon to be released shades!

Are you going to pic up any?

On a side note, I'm selling away my BRAND NEW Anastasia Beverly Hills Liquid Lipstick in Unicorn at S$32. No low balling okay guys, factoring in exchange rate and shipping cost to Singapore and you won't get it near as cheap as I'm offering, even if you bought it yourself.


Why am I selling? I realised that the shade wasn't for me. So for my readers in Singapore who want it, either drop me an email or check out my Carousell account here (User: SheenaShares). Even if you're not interested, who knows, you might want something that I don't. :B

Thanks guys!

♥ Sheena V


Read more »

ZOEVA | Bon Voyage Set Close Ups + Review


ZOEVA | Bon Voyage Set
I have always been intrigued by Zoeva.

Ever since I took a leap of faith and purchased my first Zoeva brush i.e, 106 / POWDER brush, I've been lusting for more.

There was a deal going on, way way back, whereby spending at least $50 would grant you $25 off the entire purchase. 

Which essentially meant that I paid only $30* on this set :D

*This was before Luxola started categorising Zoeva as a non-sale brand. The prices has also since increased.

Having used this set for more than half a year, 
I can confidently share with you my thoughts on this brush set.


This set includes
1 x Large Drawstring Pouch
1 x Case
1 x 125 / STIPPLING brush
1 x 128 / CREAM CHEEK brush
1 x 228 / CREASE brush
1 x 237 / DETAIL SHADER brush


125 / STIPPLING

From the picture on the right, you'll find that the uppermost bristles, which are coloured white, are quite sparse. Hence unless, you're one to enjoy extremely light coverage, I would avoid using this with foundations. Tried it and found that I would have rather gone out bare faced. Hahaha. In addition, I find that there will be a lot of wastage if used with liquid foundation. The white bristles are quite long and with it being sparse, most of the liquid foundation would probably end up at the base of it.

Based on the size alone, I found it too big for anything other than applying powder. The size makes it hard for foundation to get to the nooks and crannies of the face and for precise application of blush. However, I found it perfect for setting powder, more specifically, I enjoy using this for applying setting powder that are a little too pressed in the pan. Reason being, whilst soft, the bristles do not splay out/retains its shape when pressed on to a surface, making it easier to grab product. For example, I use this brush for Soap & Glory's Kickass Powder and Les Neiges de Diorsnow by Dior where I find it hard to get product with regular round powder brushes. On the other hand, I would avoid using this on powders that are crumbly/delicate like the Hourglass Ambient Lighting Powders. I tried it once and made a mess, not to mention a lot of (expensive) powder wastage.


128 / CREAM CHEEK

Similar to the 125 / Stippling brush, the 128 / Cream Cheek brush is white at the edges as well to mimic a duo fibre brush. Unlike the former, however, the 128 isn't even close to being as sparse. There is more give to this as compared to the former yet still holds its shape pretty well. 

This is excellent for products meant for a subtle wash of colours. Fair toned ladies, this is your answer to Colourpop's blushes! For my tan/deep ladies, this brush may prove to be a little too sheer for you if you want actual colour to show up. On the other hand, regardless of skin tone, this is great for applying highlighter. Although depending on your face shape, you may need to pinch in the bristles a little to get a more precise application. Well worth it since the finish you get it magic.

I personally love using this with my Hourglass Ambient Lighting Blushes. As those blushes are supposed to give you a healthy sheen rather than deposit actual colour, this brush works wonderfully with it. As mentioned, this brush does have a little give hence it won't make such a mess when you dip your brush in. It also somehow manages to get the right amount of product applied on the cheek that you'll find it hard to overdo it. Another product I love this brush with is Mac's Mineralize Skinfinish in Perfect Topping from the Lightness of Being Collection. Although that product is extremely delicate due to the embossing, this brush manages to grab the perfect amount whilst lightly grazing the surface.


228 / CREASE

The slightly pointed tip didn't feel scratchy on my lids which is a plus. It feels soft, fluffy and comfortable but there is one rather big drawback. The brush head is a wee too big for my rather small lid space -_-" So unless I'm going for my regular simple dark brown crease and nude lid, I can't use this brush else it will muddle up everything. Which is a pity since I really do like this brush. I do still use it but I just wish it was smidgen smaller and it'd be perfect for me. Regardless, this is highly recommended, especially for those with larger lid space.


237 / DETAIL SHADER

This was the only brush in the set which gave a little problem even before any use. It shed a little during the first wash which was disconcerting considering there ain't that many bristles in this in the first place. Fortunately, that was the only time it shed. Although flat shader brushes are typically awesome for packing on colour onto the lid, the bristles on this one aren't that tightly packed and the whole head is actually quite thin. Hence like the name suggests, this shader brush is more apt for detail work rather than all over the lid, unless you require a sheer wash of colour. The tip is small enough for the inner corner or this can be used for a topper shade at the middle of the lid. I personally wouldn't recommend this for highlighting underneath the browbone specifically as the bristles are too long and flimsy for that. However if you have a smaller lid space like mine, this would be great for a single shade everywhere above the crease.

----------------------------------------------------------------------

OVERALL

In general, Zoeva has good quality brushes that are kinder to the pocket (not to say these are cheap). Even though there may be some bumps here and there which I feel varies across the brushes, they are all equally soft. The handles on these brushes are wood but none of them have cracked on me yet (which I can't say the same for other brushes of the same price point). These have held up pretty well considering I have washed them multiple times since I've bought them last November. I'm one who washes her brushes after every use so you can just imagine how many times I've washed them since.

If you've not tried the brand but are ready to upgrade from the random brushes from random stores, pick out one that you feel is missing from your kit to test waters. That's what I did, no regrets.

If you've tried the brand, let me know what you think Zoeva has that others don't. Love to know!

♥ Sheena V


Read more »

Swatch | MAC | Mac Is Beauty | Reel Sexy + Make Me Gorgeous + Diva-ish + Silly

Mac Is Beauty
Available 24 April (SG)
 Oh hello!

Today's post will just be a short one because I really wanted to publish my swatches of the shades I have despite not being able to test them out fully yet. You know, in case my fellow brown biscuits were wondering which shades would look good ;P

This girl has been cooped up at home studying to be testing lipsticks instead. But that ain't stopping me from shopping online! Nyehehehehe.

"Mac is Beauty" launched, I believe, on March 30 in the United States. Hence home girl here was camped in front of her computer to add these to her cart before the ones she wanted sold out. Nothing new. Heh.

This collection is made up of;
- 16 x Pro Longwear Fluidline
- 4 x Eyeshadow
- 1 x Eye Kohl
- 4 x Cremesheen Glass
- 2 x Beauty Powder
- 3 x Studio Nail Lacquer 
- 3 x Brushes
- 12 x Lipsticks

Of the 12 lipsticks, there was 1 Matte, 3 Amplifieds & 8 Lustres.

Lustres, in my opinion, look unflattering on textured lips. As lustres are very sheer with an uneven distribution in colour, pigment tends to pool up in the cracks and wrinkles on the lips. You'll end up with lines of colour on your lips, which in my opinion, isn't very flattering. So something to take note of if your lips aren't smooth like butter.

Hence I obviously stayed far, far away from the Lustres and stuck with the Matte and Amplifieds.

Even then, I'm not the biggest fan of the Amplified Finish. 

Reason being, Amplifieds in general have a thinner consistency which I don't favour. If you're someone with naturally dark lips, say brown like mine, your natural lip colour will show through. The lighter the shade, the more contrast there is (see Reel Sexy swatch later). So depending on what kind of coverage you are into, you may or may not like this finish.

On with what I picked out;


When first opened each individual tubes, I was like, "Wait, did I buy repeats?!"

At one glance, Diva-ish looked similar to Silly and Make Me Gorgeous to Reel Sexy.

But of course they weren't. Duh.

Once I placed them side by side, the difference was more apparent.


And swatched, they were strangers!


Note: For each shade, left swatch = 1 swipe & right swatch = 3 swipes

Now on to the lip swatches.

Click to enlarge
(Forgive my dehydrated skin)
If you've clicked to enlarge, you will find that Reel Sexy (Amplified) is the least forgiving on my lips as my lip colour and the lipstick shade are like on the opposite ends of the colour spectrum.

In addition, out of the 3 Amplified, I found Reel Sexy to have the thinnest consistency. I'm not saying it's bad, it still glided on well. It's just not very forgiving. However, the shade itself I love. I think it is very flattering on my skin tone.

Heck. I think all 4 shades look pretty darn good on me ;P

One thing to note though, all 3 Amplifieds does catch on to dry skin. To prevent the crumblies, remember to exfoliate!

Well, I hope the swatches and my little commentary has been helpful. Heh.

If there's any questions, feel free to leave them below!

I also bought the beauty powder in Pearl Blossom, such a stunning highlight! I urge you guys to give it a swatch when you can. Swatches are on my Instagram. It's a repromote from the Barbie Collection. Alpha Girl was surprisingly nice too (I rarely have luck with Mac blushes) but I left it behind as I recently bought a similar shade from a different brand. Plus, you gotta trust Barbie! :B

That's it guys!

Again, word on the grapevine is that these will be out in Singapore 24 April. One of the beauty assistants informed me that these will be available at ALL counters. The lipstick will probably be priced at $30 each since they're in the regular black packaging. It's already out in Malaysia so if you happen to be in JB, check out the MAC outlet at JBCC Komtar, it's right beside City Square. Remember to say Hi to Xin Ye for me!

♥ Sheena V

PS: Would you guys still be interested if I posted up swatches from the Julia Petit and Philip Treacy collection? I know it's been out awhile but I saw that the shades were still available spread across Tangs Orchard, Mac NAC and Mac Ion when I was out few days back.  Let me know down below (:

Read more »

US Online Shopping | VPOST or Comgateway?

Why Hellooooo Guys!

Some of you may know that I'm currently on a blogging hiatus until my exams are over, but if you've missed me so dearly, keep in touch on my Instagram okay? ;)

So anyway, I'm breaking this hiatus for a bit because there seems to be a battle on my Instagram feed to which forwarder service provider is better - Vpost or Comgateway?

SHEENA IS DOING SOME ONLINE DAMAGE
I am a user on both platforms, alternating between the two depending on my needs.

I'm not here to provide a fast and hard answer.

I am, however, going to provide you with the basis to decide, based on your needs, to which service is more beneficial to you.

[NOTE: Best read in 'web version' for easy reading of tables. Footnotes, which are important, appear tiny in the 'mobile version'.]

1. AIR FREIGHT SHIPPING COSTS
Firstly, let's compare the shipping costs in general.

SOURCE 1 SOURCE 2
Do also note that there are usually credit/debit card discounts available so don't forget to search for those to get more bang for your buck.

Different shoppers have different needs. Some simply need a one-off delivery, others need it for a massive shopping spree. Hence I'll provide you with some scenarios to help you best decide which is more cost efficient to you.

SCENARIO 1: Single Package


If you forsee your sole package to weigh more than 9kg either in volumetric or actual weight, Vpost will always be the cheaper option. (Actually if your sole package weighs more than 9kg, you should actually consider Sea Freight via Vpost instead but that's a story for another day.)

If your package is less than 9kg, it actually really depends. This is because Comgateway will round up to the nearest 0.5kg which may work against your favour as shown above. Through further calculations (not shown), I have found Comgateway is only cheaper a package that weighs 0.5, 0.9, 1, 1.4, 1.5, 1.9...... so on and so forth (do you see the pattern?) Even then, the difference in cost gets lesser as the package gets heavier and ultimately is indifferent at 9kg.

Notice that at the lowest possible weight charged i.e. 0.5kg, Comgateway is only 7% cheaper. Which means as the package gets heavier, the difference in % gets smaller.

Why am I pointing this out?

As mentioned in foot note #5, fuel surcharge has not been included. Based on the Fuel Surcharge in the past 3 months, it is unlikely to fall below 7% thus VPOST is highly likely always cheaper than Comgateway.

SOURCE

SCENARIO 2: Multiple Packages

When dealing with multiple packages, there are an infinite number of combinations/examples I can come up to compare costs. However, for the sake of my sanity, I'll just bring up two different types of scenarios. For both cases, let's assume that I have 3 packages to consolidate, each weighing 0.5kg.

CIF = Cost of Goods + Insurance + Freight

a) Total  CIF < $400 i.e. No GST


Assuming each package has a declared value of S$100;


For both forwarders, no GST is payable as the CIF falls below the Tax Free Allowance of S$400.

Do take note that I have intentionally left out insurance for VPOST because not everyone might feel the need to do so. Should you require all your packages to be insured, VPOST would set you back an additional $29.70 hence making Comgateway the cheaper alternative.

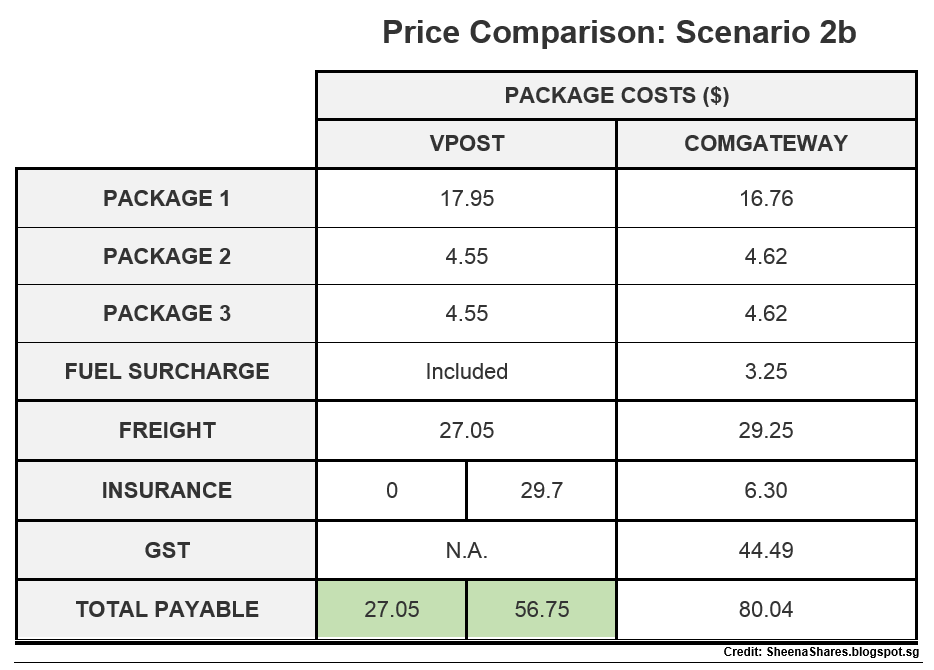
b) Total  C.I.F > $400 i.e. GST

Now this is where the main difference between the two forwarders take place.

Assuming each package has a declared value of S$200;


As you can see, having a high declared value per package changes the game rather drastically.

Even if one chooses to take up insurance, VPOST is undoubtly the cheaper option in such a scenario.

Therefore, for all you shopaholics out there, VPOST is the way to go!

*For more information on how CIF is calculated, visit here (Vpost) and here (Comgateway).

2. CONVENIENCE

If I'm not mistaken, VPOST only delivers during office hours. Hence, if there is no one to receive your package at home, there is the option to pick up your package at either your selected post office or POPStation. This option is very convenient as it reaches your hands faster since the postman need not make the failed trip to your house. Click here to view all 58! POPStation locations. Picking up my parcels at a POPStation is actually one of my favourite things to do. Nothing beats opening multiple doors to happiness :B

Parcels from Comgateway are fulfilled by DHL. Deliveries from DHL are not limited to office hours thus making it even more unpredictable. Recently however, Comgateway has started a service whereby one could pick up their parcels from selected Cheers and FairPrice Xpress counters. However, compared to VPOST's extensive list, this service is only available at 17 outlets.

I've tried this service once back in February and had my boyfriend help me pick it up since I was overseas. He specifically told me not to use this service again as he had to wait a good 30 minutes at the counter itself for the staff to get the parcel sorted. Staff may or may not be better trained now. Do note that this service is done by the Cheers/NTUC staff hence the level of professionalism and adeptness may vary.

If you are unconcerned with the price difference between the two and just want one which is more convenient, just take note of which service has a more convenient collection point for you.

3. MERCHANT POLICY

Certain merchants do not allow deliveries to forwarding companies for unspecified reasons. Thus the only way to order from said merchants is to make use a concierge service like VPOST's VShop4u or Comgateway's BuyForMe service.

Even then the respective forwarders have their respective "restricted merchants".

The list for vShop4u can be found here and as far as I know, Comgateway's BuyForMe service allows you to order from anywhere under the sun.

I can't discuss much on this point as I personally have used neither.

vShop4u does not charge any concierge rate whereas Comgateway's BuyForMe service charges 5% of your total declared value.

While vShop4u is seemingly cheaper, Comgateway's BuyForMe service may actually be the cheaper option. Reason being, vShop4u predetermines the weight to a minimum of 0.5kg per item, not per order.

Here's a very simplified example;
I order 3 items from the same merchant with actual weight 0.1kg each. Each item costs me $50.
All 3 items will be delivered in the same box of volumetric weight 0.5kg.


In the instance of the above example, Comgateway is actually cheaper.

However, as to which is the ultimately cheaper option depends largely on your declared value.

As the declared value increases, Concierge Fee + Fuel Surcharge + Insurance will also increase hence making the total payable higher. Eventually, these costs will be larger than vShop4u's inflated weight charge making vShop4u the better option.

Vshop4u is basically ideal for those who have 1 small, but very expensive, item to ship as the total payable is not dependant on the declared value.

Lucky for us, you can submit an order for quotation without any payment with vShop4u (an account is required first) and from there, deduce if the inflated weight charge is worth sticking with vPost or heading over to Comgateway.

-----------------------------------------------------------------------

Phew. I hope you guys have found my verbal vomit useful. Do let me know in the comments because interaction is always good :)

Also, if you find that any information I've put up is false, unclear etc, do also let me know and I'll edit accordingly.

Before I end, just a little Public Service Announcement;

SPEND WITHIN YOUR MEANS
With that, bye guys!

♥ Sheena V

Disclaimer: I am affiliated to neither vPost nor Comgateway. My tables, figures and calculations are based on facts/info provided on both websites hence I urge you to visit the read the footnotes mentioned and links provided should you require verification. Additionally, I encourage you to do more research but I personally am happy with either. (:
Read more »

Review + Swatch | Colourpop Cosmetics | Lippie Stix in Frida, Lumiere & Button


Hey guys!

If you follow me on instagram @SheenaShares, you'd know that I promised these swatches a while back. So this post is actually a long time coming. And I'm only gonna give you half of what I promised. Terribly sorry about that.

Apologies aside, let's do a recap on the shades I got.


The 6 shades I got were Dalia, LBB, Brink, Frida, Lumiere and Button.


However, today, I'll be sharing my thoughts on only the 3 lightest shades i.e. Button, Lumiere and Frida.

Just a quick overview, these lippie stix are very creamy across the board. The extent on how creamy the lippie stix depends on the finish (satin being creamier than the mattes) but still creamy nonetheless. The scent I get on this is reminiscent of Maybelline lipticks ("play dough"-ish) though on a fainter scale. Therefore I doubt these would offend anyone's nostrils.

[NOTE: The lighting of each picture differs slightly because I shoot using natural light. I have adjusted the properties accordingly, such that the true colour of the lipstick is shown (as much as possible) although the true colour of my skin is not. Hahaha. In addition, no lipliner or balm was used so excuse the less than precise application (: ]

-----

LIPPIE STIX | BUTTON

LIPPIE STIX | Button | Lip Swatch
BUTTON is described as a mid tone warm nude shade with a satin finish. On my lips, it looked lighter than a medium pink with a peachy undertone. I would advise those with a skintone of NC40 and above to stay clear from this shade to avoid looking pasty. 

TEXTURE: 5/5
The texture is very smooth and creamy. In comparison to Mac lipsticks, I would say that the texture is more a kin to cremesheen rather than satin. 

APPLICATION: 4.5/5
The formula made for smooth application. However, 0.5 mark deducted because you do have to be careful not to twist up too much or risk breaking it. This shade in particular seemed more fragile than the rest. 

PIGMENTATION: 5/5
Despite it being a light shade, pigmentation was on point as it even covered the outer edges of my lips, which are pigmented dark brown.

LONGEVITY: 4/5
It remained more or less the same after 6 hours of no eating or drinking at home. It was neither drying nor hydrating. Hadn't put it through the eating test because I never use this colour out (too pasty for public). But I would imagine reapplication is much recommended with it being a light shade.

LIPPIE STIX | Lumiere

LIPPIE STIX | Lumiere | Lip Swatch
LUMIERE is described as a dusty mauve pink with a matte finish. In person, it has a bit of a white undertone to is which may not work for my skin tone or darker. I personally do not like this shade on me. I love mauves but for some reason, it makes me look pale. For reference, I'm a 173 in MUFE HD Foundation.

I also feel the need to add this because many people expect it to look the same on the lips as it does swatched on the back on the hand. The back of our hand tends to be more neutral because it rarely comes directly under the sun. Unless your lips are a true pink, it is unlikely that it will show up as a true mauve on the lips. If you want that look, get both the pencil and the lippie stix. 
  
TEXTURE: 4.5/5
This formula, or rather the matte formula in general, does not drag but it is less emollient/creamy than the satins.

APPLICATION: 4/5
As this formula is less creamy, more attention is need when applying. Put too much pressure and these would break. In addition, this particular shade is not buildable. In the close up, you can still see my lip colour peeking through. This was despite trying to create a more opaque layer. Layering actually caused some of the cream to move around a bit. 

PIGMENTATION: 4/5
From the close up, you can definitely see the other edges of my lip. In addition, you may or may not tell but my inner lip colour can actually still be seen, just that not so obvious because my inner lip colour is similar. However, if I were to look in a mirror, I can definitely tell which parts of my lips a 'exposed'.

LONGEVITY: 3.5
It remained more or less the same after 6 hours of no eating or drinking but by the end, it got slightly drying. On me, these didn't last me through a meal. It went extremely patchy after a meal. Not transfer proof.

LIPPIE STIX | Frida
LIPPIE STIX | Frida | Lip Swatch
FRIDA, funnily, is described as a warm mid tone nude pink, which is a similar description to Button. Reason being, I found Button to be more pink than Frida. Frida is similar to Button but has a tinge more orange to it. Frida is a satin finish. I personally think this a a great nude for me (lighting is making my skin tone look fairer than it actually is, in reality, there isn't that much contrast.)

TEXTURE: 5/5
Similar to Button, texture is very smooth and creamy. In comparison to Mac lipsticks, this is similar to a cremesheen finish.

APPLICATION: 4.5/5
The formula made for smooth application. However, 0.5 mark deducted because you do have to be careful not to twist up too much or risk breaking it, although not as fragile as Button.

PIGMENTATION: 4.5/5
My inner lip colour is fully covered, only the edges of my lips lay exposed hence the 0.5 mark deduction.

LONGEVITY: 4.5/5
It remained more or less the same after 6 hours of no eating or drinking. It was neither drying nor hydrating. It didn't become patchy after a meal but it didn't exactly last me through a meal as well. One could go on without reapplying but for me, reapplication was a better choice. Not transfer proof.

-------

That's it guys.

'Til the next post!

Read more »

Life Update #1


Hey there!

Hope this finds you well (:

I've been short of time recently because my prelims and exams are fast approaching. In Feb/Mar and May/Jun to be exact.

Therefore I apologise that I haven't been updating twice a week as I've been last year. I do try to update at least once a week and there should be a Review + Swatch on 3 of Colourpop Cosmetics Lippie Stix. I know I have 6 but I could only photograph 3 before I had to head out. Haha.

As much as I would like to post up swatches of the myriad of lip products I have, those posts are dependant on the sunlight and Q's availability because it is him who helps photograph me. Which means that I basically only have the weekends to do that. In addition, the past two months have been rather gloomy therefore at times the sunlight I get isn't bright enough. #thestruggleisreal

Don't fret though, I've been compiling whatever product photos I can shoot by myself and planning out my blog schedule for when I finally am on semester break. I may be busy with school + work, but I still found time to shop online. Heh.

RECENT HAUL

I've been testing out products and formed opinions on most of them so I'm very excited to when I can finally get the chance (and time) to share it with you. That's why I started this blog is the first place, I'm a opinionated individual wanting to be heard. Hahaha. I'll also posts prioritise limited edition releases because what's the point of updating if it's already sold out right?

SEOUL 2014

Makeup aside, if you've read my travel tag, you'll know that I went on holiday last Dec to Bangkok and Seoul. I also have some posts planned pertaining to that but those will to wait. (Not to mention I still have my Perth posts. Heh.) Those posts won't exactly be about what I did but more to Tips & Tricks you might appreciate knowing before heading there, from a budget (basically whatever category I belong in) traveller perspective.

MY 22nd BIRTHDAY LUNCH

On to something more personal, I recently turned 22 and I feel... Old. It's not the number itself that makes me feel old but the fact that my youngest sister is finally in secondary school.We have a 9-year age gap, get what I mean? Sometimes I forget she's too old to get toys as presents. Hahaha.

BACK IN 2010, LOOK HOW YOUNG MY SISTERS ARE

That's basically all I have to offer today. May you have a wonderful week!

♥ Sheena V

Okay, maybe one last thing. 

Q meanly made this meme;


Hahaha he cb.
Read more »
Powered by Blogger.